Introduction
Amdatu Web offers the JAX-RS API to easily implement RESTful web services. JAX-RS is a Java EE standard that provides support to create RESTful web services with use of annotations. This makes adding a RESTful web service in Amdatu as simple as registering an annotated class as an OSGi service. It will automatically be picked up by the framework and made accessible as REST endpoint.
How to use
Creating a RESTful service
The following example demonstrates how to register a simple service. The example uses Felix Dependency Manager to register the component, but of course any framework would work. The RESTful service is defined as a normal POJO intermixed with some JAX-RS annotations:
@Path("demo")
public class DemoResource {
  private String m_message = "hello world!";

  @GET
  @Produces("text/plain")
  public String hello()  {
      return m_message;
  }
}
In order for the framework to pick up our service, we need to register it as a normal OSGi service like:
public class Activator extends DependencyActivatorBase {
  @Override
  public void init(BundleContext context, DependencyManager manager) throws Exception {
      Properties serviceProperties = new Properties();
      serviceProperties.put(JaxrsWhiteboardConstants.JAX_RS_RESOURCE, true);
      manager.add(createComponent()
            .setInterface(Object.class.getName(), serviceProperties)
            .setImplementation(DemoResource.class));
 }
}
Note that there is no specific interface that you need to register your RESTful service with.
Any interface (name) will do, as the framework will look for any service that has been registered with a JaxrsWhiteboardConstants.JAX_RS_RESOURCE service property with value true.
This is the only thing that needs to be done in order to make your RESTful service available. We can access our service by going to http://localhost:8080/rest/demo and be greeted by a friendly message.
Customize JAX-RS Application
The example above is registring a RESTful service using a default JAX-RS application in case you need more control over the application for example to add custom ExceptionMapper implementations you can register a custom Application to be used for RESTful services.
An example Application implementation with support for JSON and a custom ExceptionMapper:
public class JaxRsApplication extends Application {

    private final Set<Object> m_singletons;

    public JaxRsApplication() {
        m_singletons = new HashSet<>();

        m_singletons.add(new JacksonJsonProvider());
        m_singletons.add(new MyCustomExceptionMapper());
    }

    @Override
    public Set<Object> getSingletons() {
        return m_singletons;
    }
}
In order for the framework to pick up our service, we need to register it as a normal OSGi service like:
public class Activator extends DependencyActivatorBase {
  @Override
  public void init(BundleContext context, DependencyManager manager) throws Exception {
      Properties serviceProperties = new Properties();
      serviceProperties.put(JaxrsWhiteboardConstants.JAX_RS_APPLICATION_BASE, "/app");
      serviceProperties.put(JaxrsWhiteboardConstants.JAX_RS_NAME, "example.rest.application");
      manager.add(createComponent()
            .setInterface(Application.class.getName(), serviceProperties)
            .setImplementation(JaxRsApplication.class));
 }
}
And to link the DemoResource to this application the registration of that service needs to be changed a little
public class Activator extends DependencyActivatorBase {
  @Override
  public void init(BundleContext context, DependencyManager manager) throws Exception {
      Properties serviceProperties = new Properties();
      serviceProperties.put(JaxrsWhiteboardConstants.JAX_RS_RESOURCE, true);
      serviceProperties.put(JaxrsWhiteboardConstants.JAX_RS_APPLICATION_SELECT, "example.rest.application"); (1)
      manager.add(createComponent()
            .setInterface(Object.class.getName(), serviceProperties)
            .setImplementation(DemoResource.class));
 }
}| 1 | By adding the an "application select" service property the resource will be bound the application we registered with "example.rest.application" as it’s name. |
With this change we can access our service by going to http://localhost:8080/app/demo and be greeted by a friendly message again.
@Path annotation and HTTP methods
The @Path annotation is used to specify on which URL the resource will be available. It is required on the class level, and can optionally also be used on methods. See the following code for an example:
@Path("demo")
public class DemoResource {
  /**
  * If no @Path is specified on the method the endpoint is registered on
  * the application's @Path (/demo in this case). Only one method of the
  * same HTTP type (GET/POST/PUT etc.) can be registered on the same @Path.
  */
  @GET
  @Produces("text/plain")
  public String hello() {
    return "hello world";
  }

  /**
  * For each HTTP method a method can be registered on the same @Path
  */
  @POST
  @Consumes("application/json")
  public void saveHello(String body) {
    // Do something awesome
  }

  /**
  * A @Path method on a method will register the endpoint on a sub path of
  * the @Path of the class. This example will be registered to /demo/hello.
  */
  @GET
  @Produces("text/plain")
  @Path("hello")
  public String hello()  {
    return "hello moon";
  }
}
Path and Query parameters
In JAX-RS it’s easy to retrieve information from the path, headers and query parameters using annotations on method parameters. In the following snippet, we bind the query parameter named filter to the method argument named filterStr.
@Path("demo")
class MyResource {
  @GET
  @Produces("application/json")
  public ConferenceList list(@QueryParam("filter") String filterStr) throws Exception {
    System.out.println("Filter = " + filterStr);
    return null;
  }
}
When making a REST-call to, for example, http://localhost:8080/demo?filter=condition, the following message is printed to your console: Filter = condition.
In the next snippet, we bind a part of the resource path as argument to a method:
@Path("demo")
class MyResource {
  @GET
  @Produces("application/json")
  @Path("{id}")
  public Conference getById(@PathParam("id") long conferenceId) throws Exception {
    System.out.println("Conference ID = " + conferenceId);
    return null;
  }
}
With this snippet, if we would go to http://localhost:8080/demo/id123, the id123 part would be automatically assigned to the conferenceId argument.
In some situations, you want to narrow the possible values for your path arguments. This can be achieved by making use of URI Path Templates. Consider the following snippet:
@Path("demo")
class MyResource {
  @GET
  @Produces("application/json")
  @Path("{id:\\d+}")
  public Conference getById(@PathParam("id") long conferenceId) throws Exception {
    System.out.println("Conference ID = " + conferenceId);
    return null;
  }
}
In the snippet above, the possible values of what will be assigned to conferenceId is narrowed to only digits.
So, calling http://localhost:8080/demo/123 will print out the message Conference ID = 123, while a call to http://localhost:8080/demo/abc will print nothing.
Content types
In most cases it is most convenient to use JSON as content type for RESTful web services. Most languages and devices can easily work with JSON. XML is of course an alternative. You can either use JAX-B to serialize/deserialize Java objects from/to JSON and XML, or you can use your own serialization framework. In all cases, the @Consumes and @Produces annotations should be placed on top of methods to define what content types are expected and/or returned.
In the following example, custom serialization/deserialization using the Jackson library is shown:
@GET
@Produces("application/json")
public String list() throws Exception {
  ObjectMapper objectMapper = new ObjectMapper();
  StringWriter sw = new StringWriter();
  objectMapper.writeValue(sw, agendaService.listConferences());
  return sw.toString();
}

@PUT
@Consumes("application/json")
public void save(String body) throws Exception {
  ObjectMapper objectMapper = new ObjectMapper();
  Conference conference = objectMapper.readValue(body, Conference.class);
  System.out.println(conference);
}
The same example, using JAXB:
@GET
@Produces("application/json")
public ConferenceList list() throws Exception {
  return ConferenceList.fromConferences(agendaService.listConferences());
}

@PUT
@Consumes("application/json")
public void save(Conference conference) throws Exception {
  System.out.println(conference);
}
Note that JAXB is capable of automatically converting a JSON object into a Java object. It does this by inspecting the objects' getters and setters which it tries to match with the key-names in the JSON object.
Self documenting REST endpoints with Swagger
Amdatu ships with a bundled version of Swagger to allow all REST endpoints to document themselves. All you have to do is deploy those Swagger bundles and (by default, but this can be configured) point your browser at http://localhost:8080/swagger/index.html to see all endpoints. You can drill down into any of them, inspect all their methods, parameters and even invoke them directly from your browser. Adding additional information about your REST endpoints can be done by annotating them with the following annotations:
-
@Description("…") can be used to add a description to classes, methods and parameters;
-
@NoDocumentation can be used to prevent a class or method to show up in documentation;
-
@Notes("…") can be used to add notes to add notes to classes, methods and parameters;
-
@ResponseMessage(code = 200, message = "…") can be used to describe a response code and message which is returned by a method;
-
@ResponseMessages({ @ResponseMessage(code = 200, message = "…"), { @ResponseMessage(code = 404, message = "…") }) can be used to describe an array of possible response codes and messages returned by a method;
-
@ReturnType(AnyClass.class) can be used to describe the return type for a method.
The following example shows how to use the annotations to describe a simple endpoint which returns a message:
@GET
@Path("myPath")
@Produces({ MediaType.APPLICATION_JSON })
@Description("Returns a friendly JSON message")
@Notes("This is an example")
@ResponseMessages({ @ResponseMessage(code = 200, message = "In case of success") })
@ReturnType(String.class)
public Response helloResponse() {
  return Response.ok("\"hello world\"").build();
}
JAX-RS in a modular world
Deciding how to structure your code into modules is of course very application specific and it is impossible to give come up with a blueprint that is suitable for every application. A model that works well, as a starting point, is the following:
-
Each JAX-RS endpoint is deployed in a separate bundle
-
Don’t write any re-usable code in JAX-RS endpoints
Let’s say we have an endpoint /speakers and an endpoint /conferences. Both endpoints can be deployed in separate bundles for maximum re-usability. The code related to storing and retrieving the data from a datastore should be deployed in separate bundles and exposed as OSGi services. This way we could re-use the Java API without deploying the RESTful web services. Take the following picture as an example:
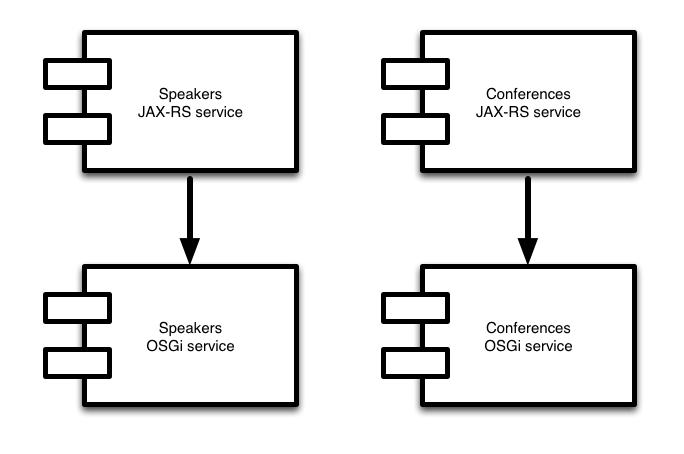
In the above figure, the business logic for managing speakers is placed in one bundle, while the RESTful service (which essentially does nothing more exposing your service as RESTful service) is placed in another. The same strategy is applied to the conference service and corresponding RESTful service. An advantage of this approach is that you can test every aspect of your business logic without the need to deploy your logic in a webcontainer. Of course, you probably will need to write integration tests to test whether your RESTful service properly follows to your service contract.
Serving static resources
The org.amdatu.web.resourcehandler bundle allows you to easily serve static resources from a bundle. All you need to do is to add two simple manifest headers to a bundle:
X-Web-Resource-Version: 1.0
X-Web-Resource: /alias;path/to/resources
The resource handler bundle uses the extender pattern to pick up these manifest headers and register them as servlet with the supplied alias. In this example, all files residing underneath the /path/to/resources (inside your bundle!) are exposed at /alias. For example, /alias/myFile.txt will be mapped to /path/to/resources/myFile.txt in the registering bundle.
To serve your resources, they should be embedded in your bundle. With bnd this is as easy as adding the following line to your bnd file:
Include-Resource: resource=resourceThis will copy all files found in the resource directory of your project to a equally named directory of your resulting bundle. Let’s go in a little more detail about the meaning of the headers. The X-Web-Resource-Version is used to mark the bundle as capable of serving static resources. The actual registration of what resources are to be served is described through the X-Web-Resource header. The format used for this header is comma-separated triplets. A pseudo-BNF grammar of this header is defined as:
header ::= entries

entries ::= entry (',' entries)?

entry ::= alias
        | alias ';' path
        | alias ';' path ';' contextId

alias ::= '/'? URLCHAR*

path ::= '/'? URLCHAR*

contextId ::= URLCHAR*

URLCHAR ::= all characters accepted in a URL (see RFC 1738), except ';'.
The alias is used for the servlet registration, while the path is used to map files to an internal directory structure. The contextId is optional, and can be used to bind the registered servlet to a specific HttpContext object (a service that should be registered separately), for example, to provide specific authentication to your resources.
A final example depicting the use of the X-Web-Resource header (the X-Web-Resource-Version is omitted for brevity):
X-Web-Resource: /public;/resource/public, /private;/resource/private;authContextIn the above situation, two servlets are registered: one listening to /public that serves files from the /resource/public directory in your bundle, and one listening to /private that serves files from the /resource/private directory, and depending on a HttpContext that is registered with the name authContext.
Defining default pages
Currently, the OSGi http service specification does not mention anything about serving a default page, like, for example, is common in a Servlet container like Tomcat. To overcome this situation, the Amdatu resource handler bundle is capable to provide a default page in case no explicit page is specified.
To define a default page, you should add the following headers to your bundle:
X-Web-Resource-Version: 1.1
X-Web-Resource: /static;/resources
X-Web-Resource-Default-Page: index.html
Note that the X-Web-Resource-Version must be set to version 1.1 for the default page functionality to work. The X-Web-Resource header still remains picked up as described. The X-Web-Resource-Default-Page explains what default page should be served in case no file is denoted in the requesting URL. In the above example, this means that a request to http://localhost:8080/static/ will cause the index.html file to be served, while a request to http://localhost:8080/static/index.html will have the same effect.
The X-Web-Resource-Default-Page can define multiple default pages separated by commas (,). The format for defining a default page is specified by the following pseudo-BNF grammar:
header ::= entries

entries ::= entry (',' entries)?

entry ::= defaultPage
        | path '=' defaultPage

defaultPage ::= URLCHAR+

path ::= '/'? URLCHAR*

URLCHAR ::= all characters accepted in a URL (see RFC 1738), except '='.
A default page can either be global, which means that the default page will be served for any requesting URL without a file. Alternatively, you can also define a default page for a particular path only. In this case, only for that particular path a default page will be served.
An example showing the use of X-Web-Resource-Default-Page header:
X-Web-Resource-Default-Page: index.html, /sub=subMain.htmlIn this example, index.html will be used as the default page, while for the /sub directory, an alternative default page is used: subMain.html.
Configuration
Changing the Swagger path
The path used for the Swagger ui can be configured by providing a configuration for the PID org.amdatu.web.rest.doc.swagger.
Property |
Type |
Required |
Description |
Default value |
path |
String |
no |
Path that is used for the Swagger ui |
/swagger |
Components
Amdatu Web provides the following components:
Bundle |
Required |
Description |
org.amdatu.web.rest.jaxrs |
no |
Provides the JAX-RS API, such as annotations and other API classes. Contains no implementation |
org.amdatu.web.rest.resteasy |
yes |
Wraps a JAX-RS implementation based on "Apache Wink":http://wink.apache.org to provide the actual REST framework in an OSGi context |
org.amdatu.web.rest.doc |
no |
Provides the annotations for documenting RESTful services |
org.amdatu.web.rest.doc.swagger |
no |
Provides the "core" servlet for generating documentation for your RESTful services |
org.amdatu.web.rest.doc.swagger.ui |
no |
Provides additional resources (like stylesheets, javascript files, and so on) for the generated Swagger documentation for your RESTful services |
org.amdatu.web.resourcehandler |
no |
Provides an implementation to serve static resources and define default pages for your static resources |
Dependencies
The following table provides an overview of the required and optional dependencies for Amdatu Web:
Bundle |
Required |
Description |
OSGi HTTP Whiteboard implementatoin (e.g. Felix HTTP) |
yes |
Dynamically picks up the Servlets that represent the JAX-RS resources |
com.fasterxml.jackson.core.jackson-core |
yes |
Used for JSON marshalling |
com.fasterxml.jackson.core.jackson-databind |
yes |
Used for JSON marshalling |
com.fasterxml.jackson.core.jackson-annotations |
yes |
Used for JSON marshalling |
org.apache.felix.dependencymanager |
yes |
Apache Felix Dependency Manager is used internally by all Amdatu components |
Resources
Tools |
Location |
Source Code |
|
Issue Tracking |
|
Continuous Build |
https://bitbucket.org/amdatu/amdatu-web/addon/pipelines/home |